The content of this blog originated as slides presented at a meeting of the San Diego Robotics Club.
I have added text where needed. Please submit any comments you think appropriate using the 'Comments' tab above. Thank you.
I have added text where needed. Please submit any comments you think appropriate using the 'Comments' tab above. Thank you.
How to add a voice to the ROBOTIS Premium Humanoid Robot kit.
A short video of Lester
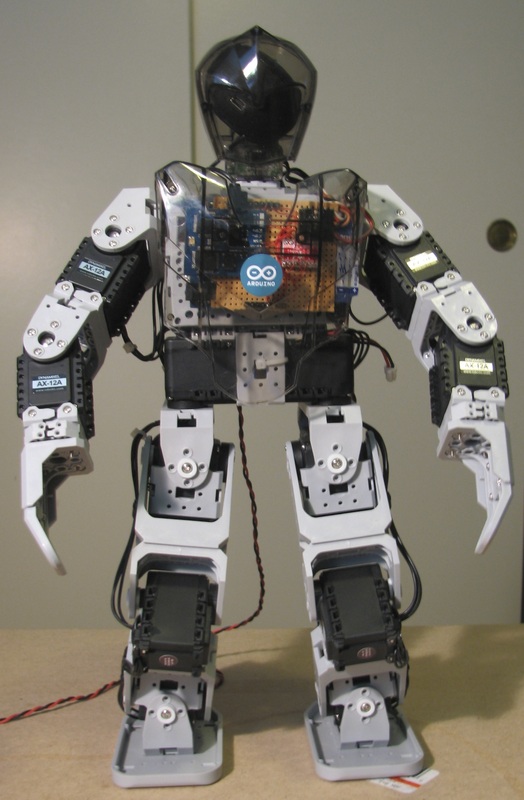
Lester was made from the ROBOTIS
BIOLOID PREMIUM Kit
Purchased from Trossen Robotics
http://www.trossenrobotics.com
BIOLOID PREMIUM Kit
Purchased from Trossen Robotics
http://www.trossenrobotics.com
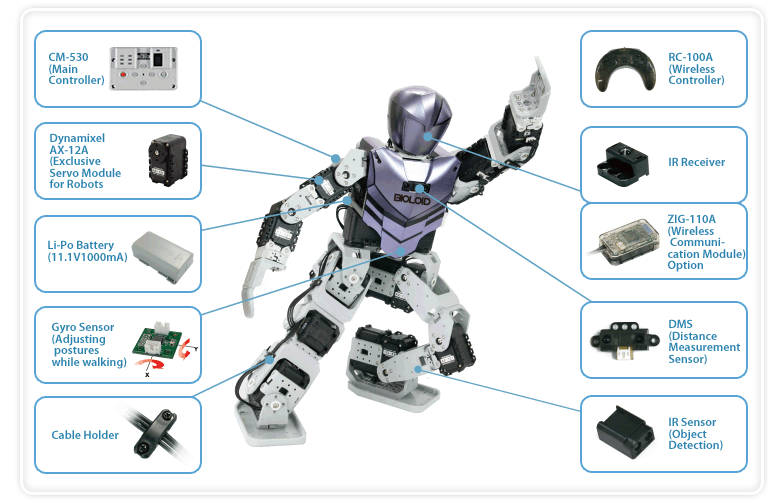
More information about ROBOTIS products can be seen at: http://robotis.us
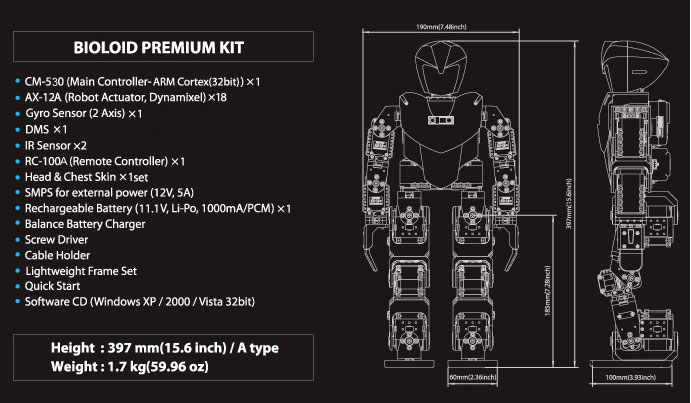
Some information about the ROBOTIS kit:
I have constructed many kit projects. This is, by far, the most complete, versatile, challenging, and rewarding kit I have ever owned. The assembly instructions are pictorial and require very careful attention to detail. The Quick Start instruction book, Software User's Guide and provided downloads are complete and well written.
A bit of advice:
Build several of the 'Beginner' assembly examples. The Beginner and Intermediate assembly instructions are downloaded from listings in the 'User's Guide'. The guide is reached from the RoboPlus splash page tab. Building these projects will familiarize you with the construction techniques and how the various frame parts relate to each other. The 'Intermediate' projects are much more challanging and will give you a chance to learn how to use the RoboPlus programming software.
When you think you are ready to take on the 'Humanoid' robot project, the building technique needs to change a bit.
You must apply a thread locking compound to each screw! The folks at Trossen reccommend placing a few drops of their plastic compatible thread locker in a plastic spoon, then dip the end of a screw in it.
The instructions are in the "BIOLOID PREMIUM Quick Start" paperback manual. There are three robot projects depicted. They are: "A", "B", and "C". The A 'bot uses all 18 servos and is the one that most of the software programming and learning references are based on. Read through all of the assembly instructions several times. Get to know the symmetry involved. Proceed very carefully and double check each sub assembly for accuracy. When you are sure all is correct, remove all of the screws and apply the thread locker. Removing a screw after the thread locker has set is very difficult. You may need to apply heat to the screwdriver shaft to warm up the screw in order to get the screw out. Sooo - check the assembly, check it again, compare it to its symmetrical opposite unit, check the servo movement, verify the initial servo position (most are centered - but not all of them are), then apply the screw lock.
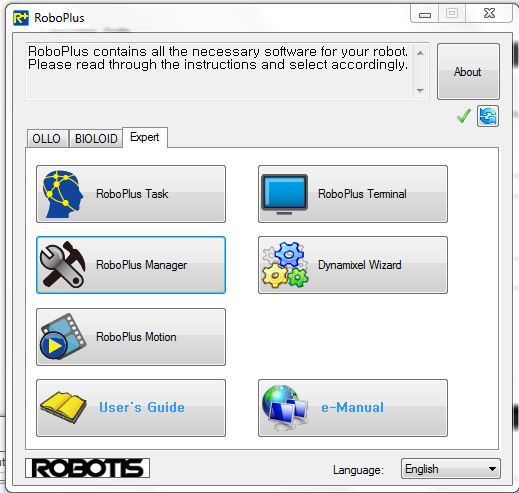
ROBOTIS
RoboPlus Software
RoboPlus Task
RoboPlus Manager
RoboPlus Motion
RoboPlus Terminal
Dynamixel Wizard
And links to User’s Guide and e-Manual
RoboPlus Software
RoboPlus Task
RoboPlus Manager
RoboPlus Motion
RoboPlus Terminal
Dynamixel Wizard
And links to User’s Guide and e-Manual
RoboPlus Splash page
|
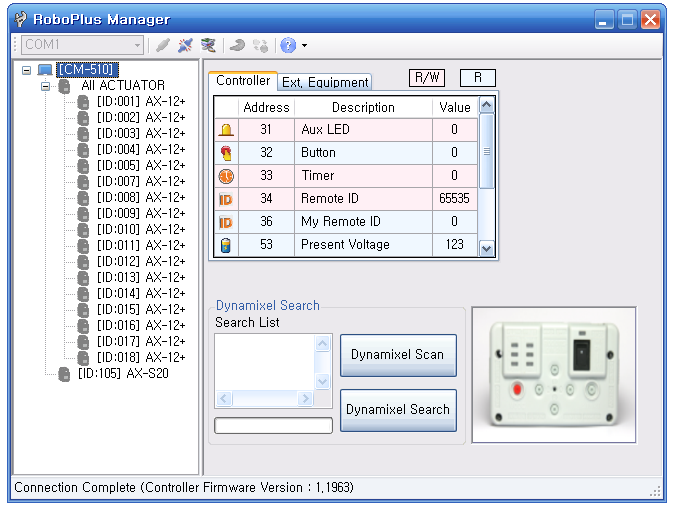
RoboPlus Manager
|
RoboPlus Task
|

RoboPlus Motion
|
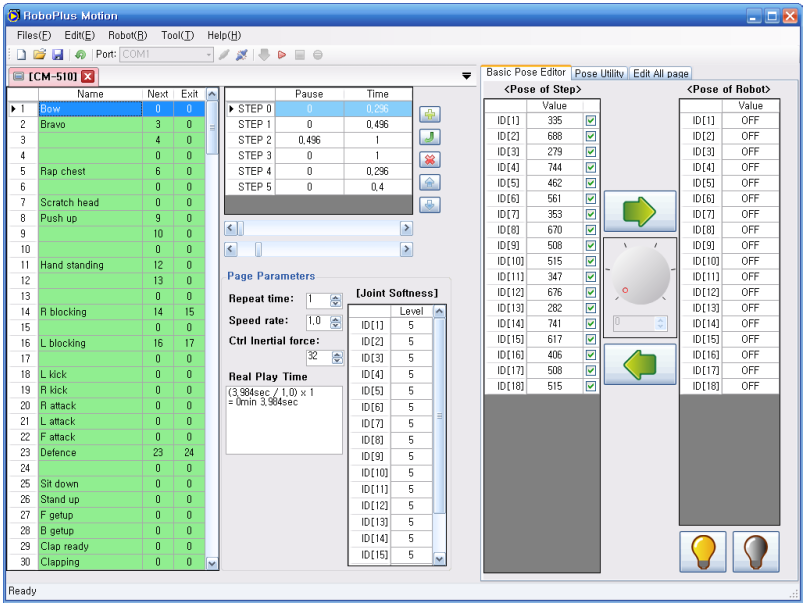
RoboPlus Motion
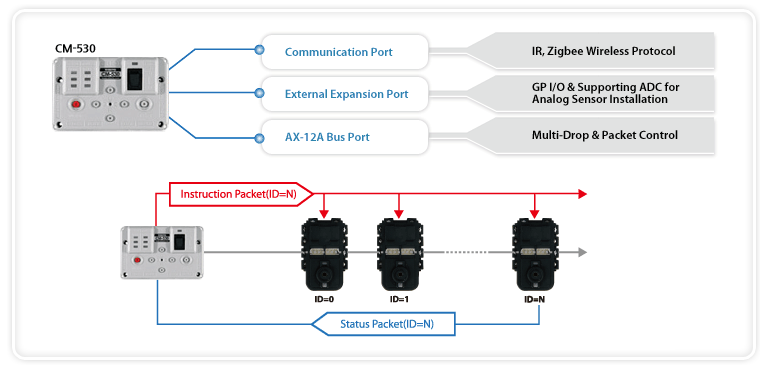
The Robotics 'User's Guide' tells us that "A motion is a set of AX-12A's (servo) position and speed necessary for robot movements. A motion file is shown here. They have the extension of .mtn
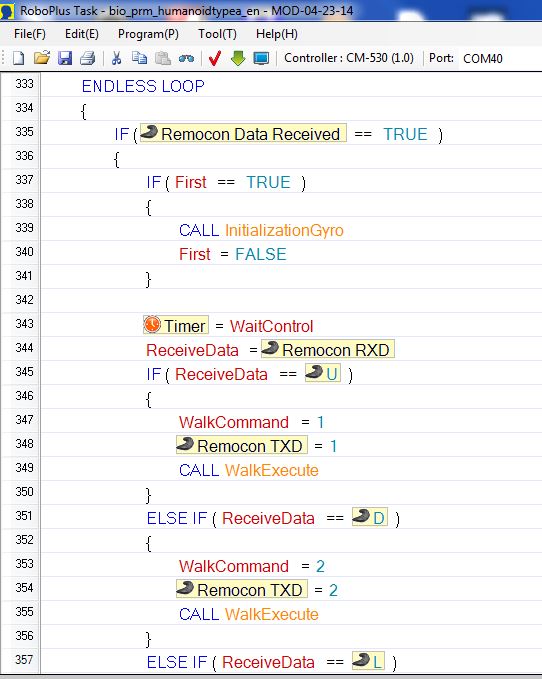
RoboPlus TASK
RoboPlus Task is a source code file, written as a directed version of C, that specifies the actions the controller will use to generate the desired motions. The file extension is .tsk.
The example below shows how I added the "Remocon TXD = #" command.
When the task file detects a button push of the RC-100 controller (U for forward), the WalkCommand for walk forward is set, the ZIG-110A sends the code sequence for "1" (the speech phrase index), and the WalkExecute procedure is called.

|
Controller button “U” (Forward) Added command (Phrase 1 “Walking forward”) Controller button “D” (Backward) Added command (Phrase 2 “Walking backward”) |
Scroll through the Task file and note where the RC-100 button pushes are detected.
Add the 'Remocon TXD = #' command. The # is number used to reference the desired spoken phrase.
Add the 'Remocon TXD = #' command. The # is number used to reference the desired spoken phrase.
The RC-100 Controller
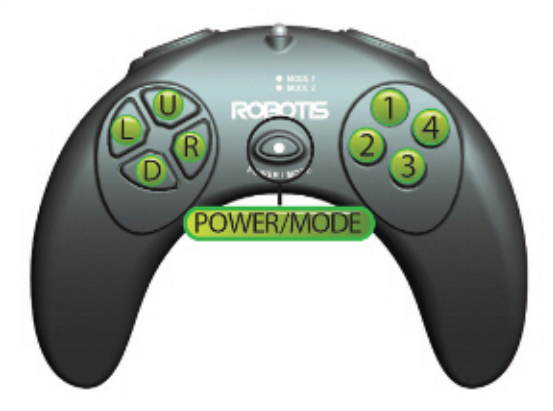
ROBOTIS RC 100
Button Commands
Basic commands:
Walking: U / D / L / R
Change Posture: 1 + U / D / L / R
Demonstration Moves: 2 + U / D / L / R
Socker Moves: 3 + U / D / L / R
Battle Moves: 4 + U / D / L / R
Button Commands
Basic commands:
Walking: U / D / L / R
Change Posture: 1 + U / D / L / R
Demonstration Moves: 2 + U / D / L / R
Socker Moves: 3 + U / D / L / R
Battle Moves: 4 + U / D / L / R
When a button (or buttons) are pressed a 'communications packet' value is transmitted from the controller to Lester.
A 'U' button press results in a communications packet value of 1. 'D' is 2, 'L' is 4, and 'R' is 8. Pressing 'U' and 'R' results in 1 + 8 or 9.
A 'U' button press results in a communications packet value of 1. 'D' is 2, 'L' is 4, and 'R' is 8. Pressing 'U' and 'R' results in 1 + 8 or 9.
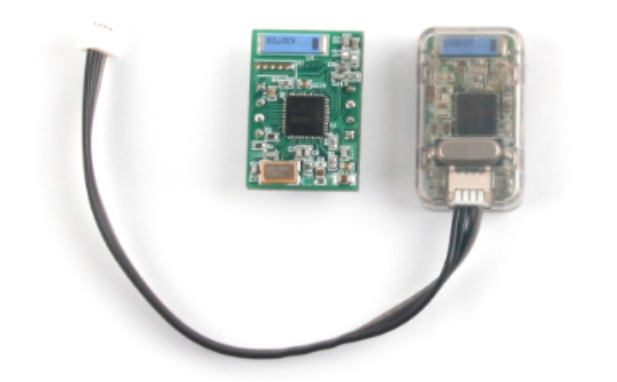
The ZIG-100 and ZIG 110A 2.4 Ghz Modules
The smaller module goes into the RC-100 Controller.
The larger module goes into ‘Lester’. They replace the IR control.
The larger module goes into ‘Lester’. They replace the IR control.
Emic 2 Text to Speech Module

Key Features:
- High-quality speech synthesis for English and Spanish languages
- Nine pre-defined voice styles comprising male, female, and child
- Dynamic control of speech and voice characteristics, including pitch, speaking rate, and word emphasis
- Industry-standard DECtalk text-to-speech synthesizer engine (5.0.E1)
Lester’s Speech Generator
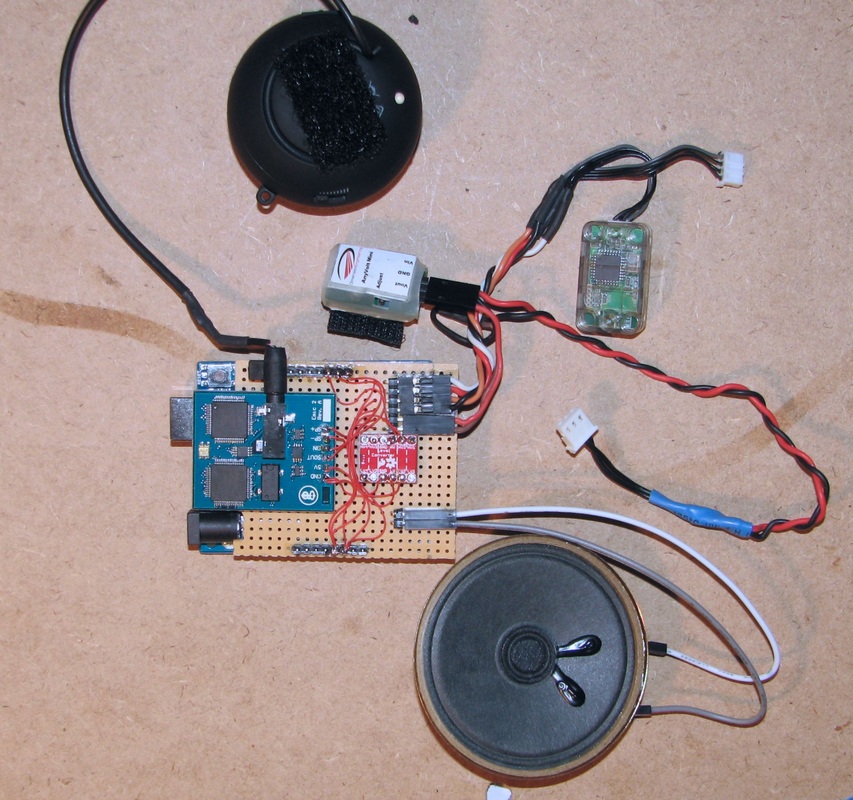
I added the Veho 360 speaker (top) and DC to DC voltage converter.
The ZIG-110A and wiring is shown.
The Arduino UNO, Emic2 Text-to-Speech Module, and Level Shifter are on a home made shield.
The 2 1/2" speaker shown at the bottom is used for testing.
The 6 pin connector assignments (1 at the top):
The ZIG-110A and wiring is shown.
The Arduino UNO, Emic2 Text-to-Speech Module, and Level Shifter are on a home made shield.
The 2 1/2" speaker shown at the bottom is used for testing.
The 6 pin connector assignments (1 at the top):
- ZIG-110A TX White
- ZIG-110A RX Red (not used)
- ZIG-110A 3.6V Orange
- ZIG-110A GND Black
- 5 V Red
- GND Black
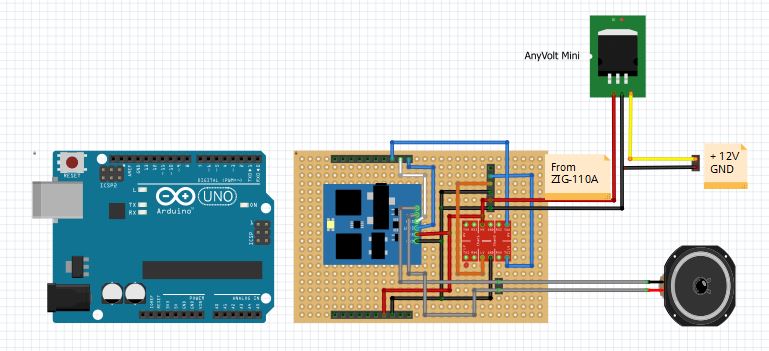
Lester’s Speech Generator Schematic
Parts List
- ROBOTIS Bioloid Premium Robot Kit Trossen Robotics http://www.trossenrobotics.com
- Bioloid Zigbee 110 Wireless Module Set Trossen Robotics
- Emic 2 Text-to-Speech Module Parallax Inc. http://www.parallax.com
- Veho 360 Speaker Parallax Inc.
- Arduino UNO R3 Adafruit Industries http://www.adafruit.com
- Logic Level Converter SparkFun https://www.sparkfun.com
- AnyVolt Micro DC to DC Conv. Dimension Engineering http://www.dimensionengineering.com
- Perf Board Radio Shack http://www.radioshack.com
- 2 1/2" Speaker (for testing) Fry's Electronics http://www.frys.com
Lester Speaks Arduino Sketch
Initial information
#includes, #define(s) and parameter assignments including the speech phrases
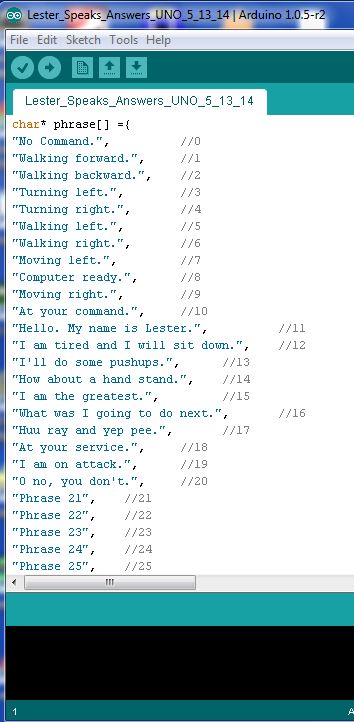
Speech Phrases
The phrases are elements of an indexed array.
|

|
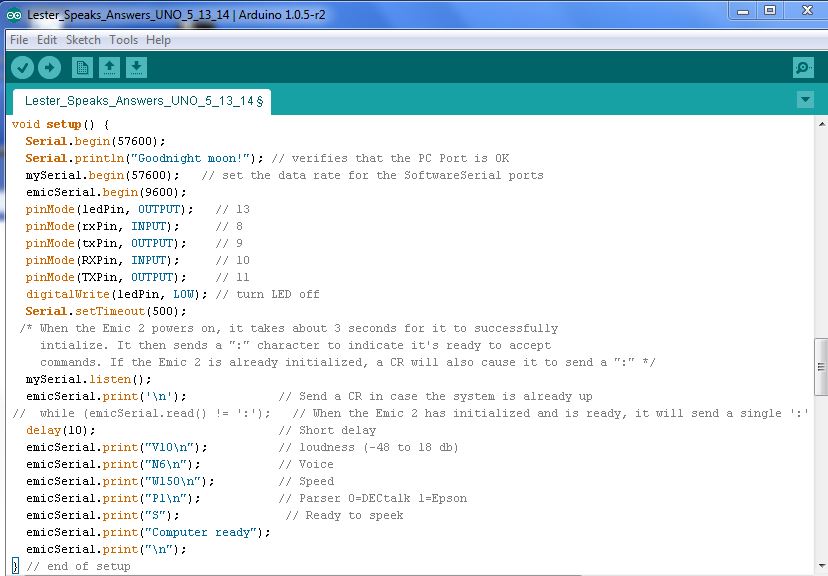
setup()
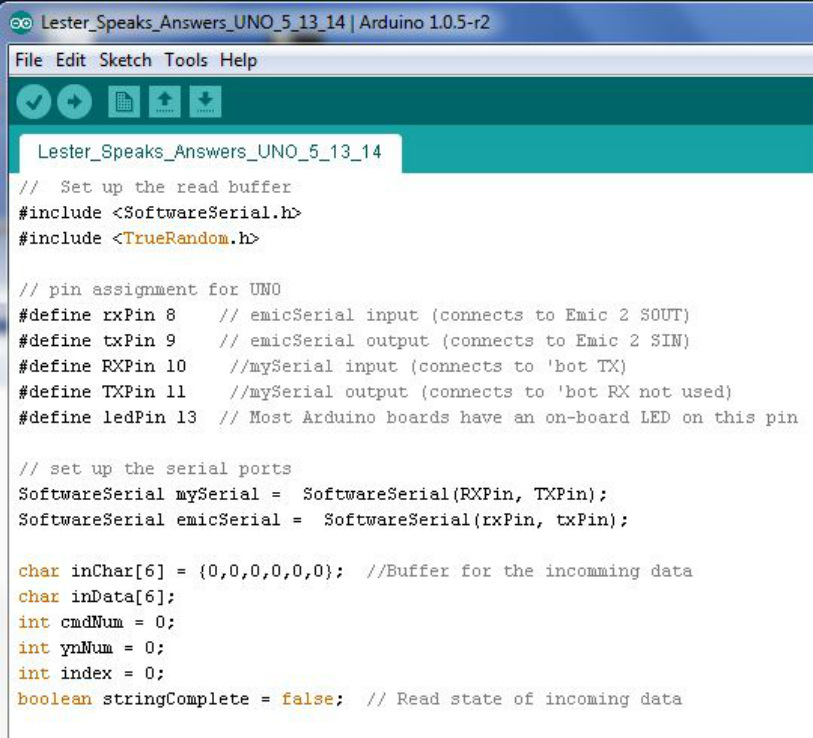
The serial port assignments are:
Serial 57600 bd The USB port
mySerial 57600 bd The ZIG-110 port
emicSerial 9600 bd The Emic2 board port
Serial 57600 bd The USB port
mySerial 57600 bd The ZIG-110 port
emicSerial 9600 bd The Emic2 board port
loop()
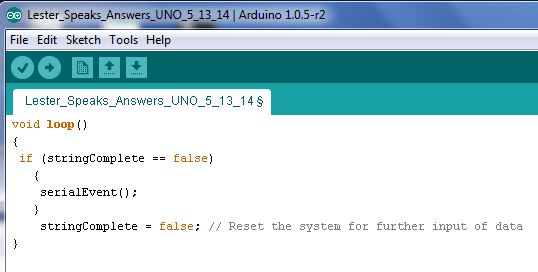
serialEvent()
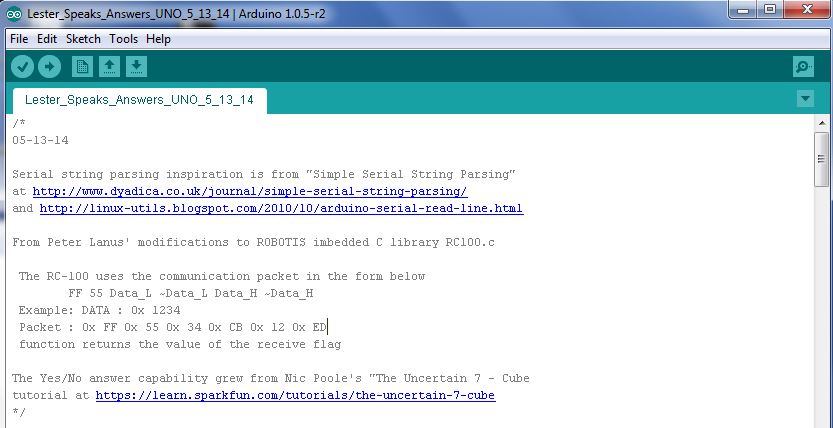
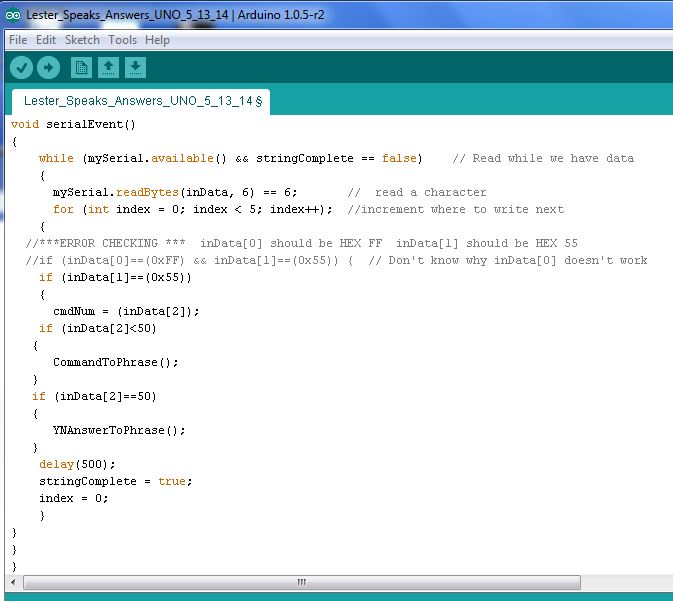
The RC-100/RC110A uses a communication packet that is in this form:
FF 55 Data_L ~Data_L Data_H ~Data_H All values are Hex. For example the packet for Data Value 0x 1234 would be:
FF 55 34 CB 12 ED 0x CB is the ~ or 2s complement of 0x 34, 0x ED is the ~ or 2 complement of 12
The procedure serialEvent() reads the incoming data string and increments an index from 0 to 5.
If an error check (that doesn't work quite right) passes, the inData is in 6 hex characters. I only use inData[2], the 3rd character or Data_L. cmdNum is set to the value of inData[2] character. If that character value is less than 0x 50 the CommandToPhrase process is called. If the value is equal to 50 the YNAnswerToPhrase is called.
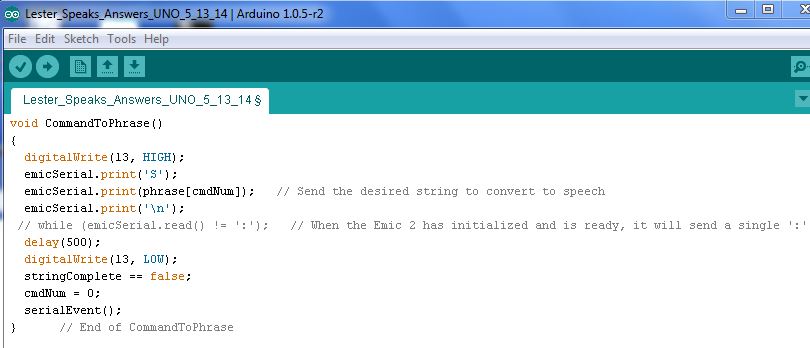
CommandToPhrase()
The CommandToPhrase procedure is called by serialEvent if inData[2] value is less than 0x 50. The Emic 2 command 'S' is sent, then the phrase indexed by cmdNum is sent to the Emic2 and Lester speaks the phrase. For some reason the verification of the Emic2 returning the ':' doesn't work.
YNAnswerToPhrase()
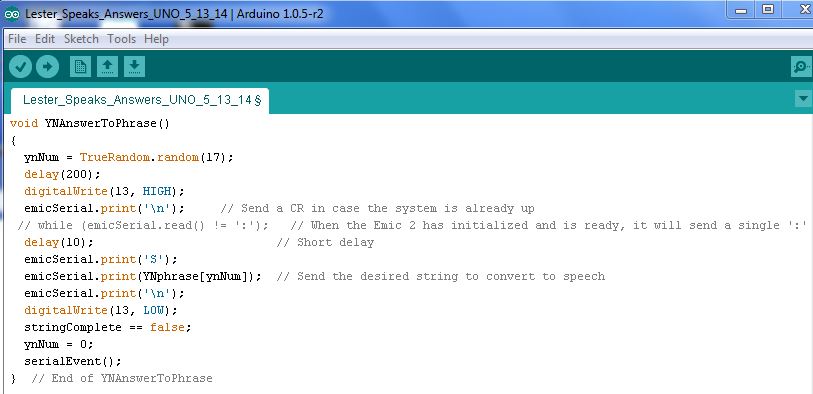
If the serialEvent calls the YNAnswerToPhrase procedure, ynNum is set to a randomly generated value between 0 and 16. The Emic 2 command 'S' is sent, then the YNphrase indexed by ynNum is sent to the Emic2 and Lester speaks the phrase. For some reason the verification of the Emic2 returning the ':' doesn't work.
My To-Do List
- Improve my error checking and general coding of the Arduino sketch. Any help will be appreciated.
- Replace the Arduino UNO with a Pro Micro. I tried but I couldn't get the Micro's mySerial port to communicate with the ZIG-110A properly. The Serial (USB) and emicSerial port work as expected. Again, help!
- Improve Lester's balance. I need to look into how the "Gyro" sensor corrections are implemented. I may need to mechanically balance Lester with weights. Changing Lester's initial stance might help.
- Add voice recognition to Lester. I have an EasyVR Development kit from Parallax.
- See how an Android/Blootooth interface and tablet/phone could be used to control Lester or serve as a super input device i.e.. voice, video, GPS, acceleration, etc.
- Directed voice enhancement (phrases spoken from text) I think would be a very valuable addition to many robotic projects. Selected audio segments (.wav files) are a good start but are not very flexible. I would like to add directed speech to the Lego Mindstorm's EV3 controller.
If you have any corrections, additions, advice, help, or general comments you would like to make, please use the 'Comments' tab at the top of the blog. Thank you.
To view the Arduino Sketch, download the file, move it to your desktop, then open it with Arduino.
| lester_speaks_answers_uno_5_13_14.ino |
